Iron Fuel Card Resources
How to Set Up Your Account
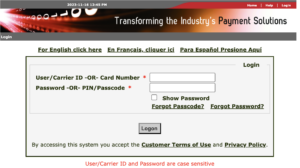
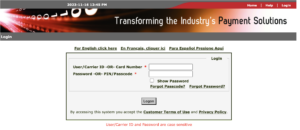
2. Log in with the Carrier ID and password that was included in an email from Iron Fuel.
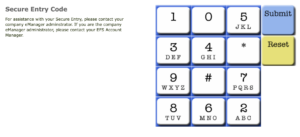
3. You will be asked to set up your Secure Entry Code. Enter a code that is 4-7 numbers long.
Once entered, it will ask you to enter the code again to confirm the code.
4. Create your user profile by filling in all the fields marked by an asterisk

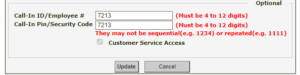
5. Add a Call-In ID/Employee number and a Call-In/Security Code and then click update.
This call-in pin allows you to get help with your account when you call customer service. The pin must be between 4-12 digits.
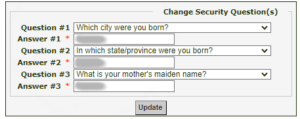
6. Select and answer 3 security questions.
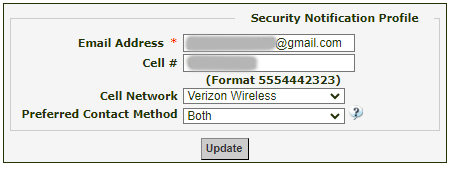
7. Complete the Security notification profile with your email and phone number. For Preferred Contact Method choose both.
*Adding your phone number can help you enter your account quicker when asked for a security token upon login.
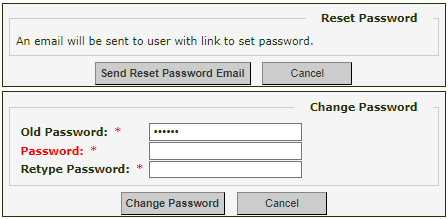
8. It may give you the option to change your password. If you’d like, you can change your password.
*Passwords must include at least 1 digit and 7 characters, 3 of which must be distinct. Avoid using special characters (e.g. ; ?).
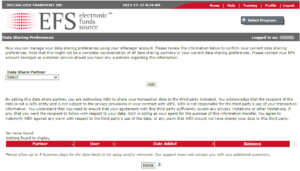
9. Once the profile has been completed, you’ll be taken to the data sharing preference page.
To share your fuel information with ELD software or other programs you are using, choose that program from the drop down menu.
Depending on the program, you will either receive an on-screen prompt or an email with additional steps.
*You can always come back and set this up later.
10. Click on the Home button at the bottom of the page. Click OK on the popup. This will take you back to the homepage where you can log into carrier control.
Your account is now set up.
11. Now you can log in to the EFS CarrierControl app, using the same credentials as you did to log in to the website. This app will help you to see your balance immediately and manage cards and transactions easily.

![]()
![]()
How to Activate Your Fuel Card
Step by Step: How to Activate Your Fuel Card
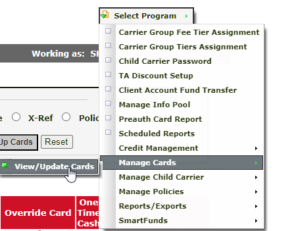
2. Go to the Select Program drop-down menu
3. From the drop-down menu choose ‘Manage Cards’
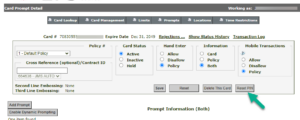
4. Choose ‘View/Update Cards’
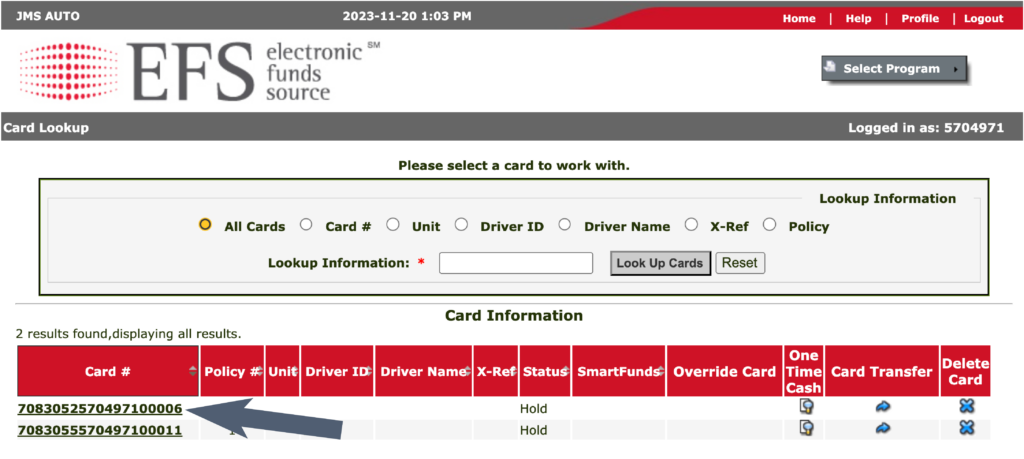
5. Click on your card number from the list of cards (if more than one card on your account)
6. Choose ‘Activate’ and click ‘Save’
Note: The “Reset Pin” button on this screen is used to log into the Wex app. For 24hrs, it changes the app pin# to the last 4 digits of your card number.
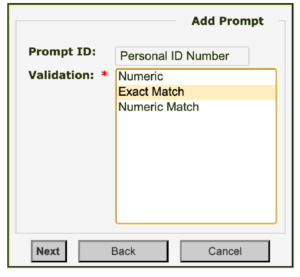
7. Click ‘Add Prompt’. This is what you’ll be asked to enter when you use your card at the pump.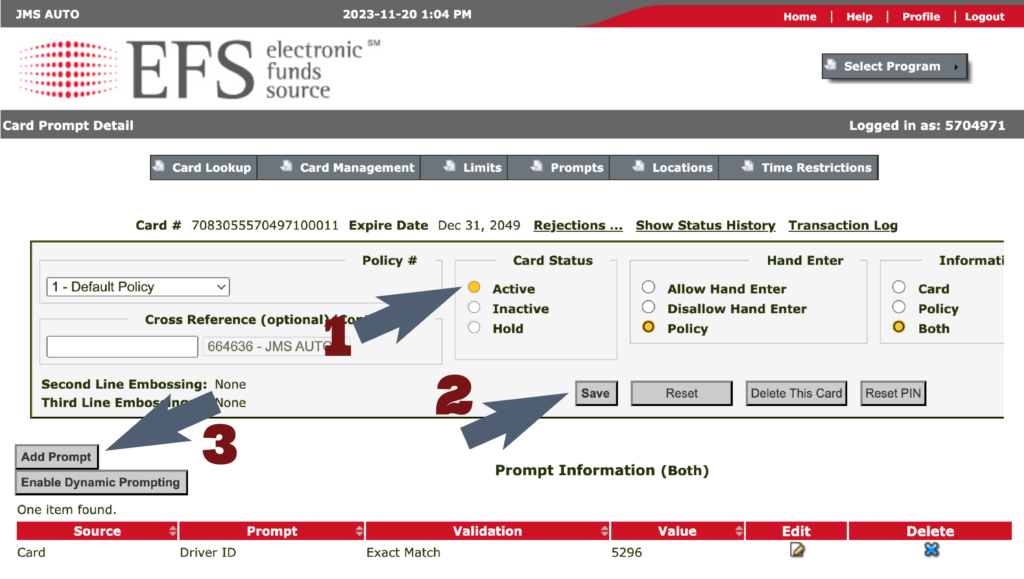
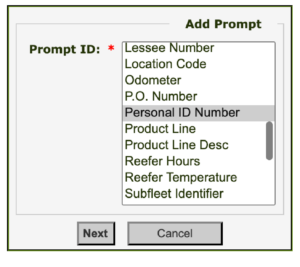
8. Choose ‘Personal ID Number’, choose ‘Next,’
9. Choose ‘Exact Match’, then ‘Next’
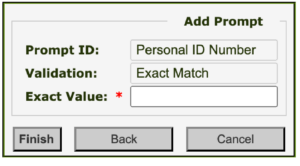
10. Enter pin# then click ‘Finish’
11. You can add unit #, driver name, etc. This is helpful if you have multiple drivers or cards.
How to Add Additional Users to Your Account
If you have multiple card users, you’ll need to set up a different account for each user.
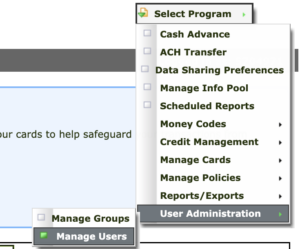
1. Select program > User Administration > Manage Users
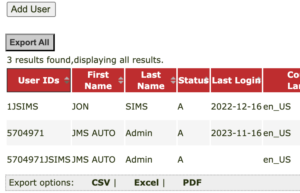
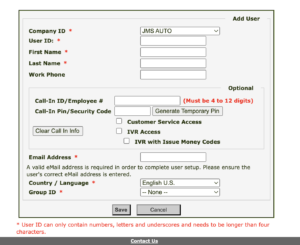
2. Click ‘Add Users’
3. Fill in all required fields with the user’s information:
- Company ID
- User ID
- First Name
- Last Name
4. Complete the Call in ID/Employee # and a Call-in Pin/Security code. This is required for users to speak to EFS employees about their accounts.
5. Add the User’s email address
6. For Group Id Select ‘Company Admin’ for Full eManager access.
7. Select Save
8. The User will receive an email with steps to complete the process of setting up their account.
Set Up and Change the PIN on Your Wex App
24 hours after your fuel card is activated you’ll need to change the PIN on the Wex Card Control App to be able to use it.
Resetting the pin is for the app only. It doesn’t change anything that you’ll be prompted to enter at the pump.
1. After the fuel card has been active for 24hrs log into your EFS Account.
2. Click Select Program at the top.
From the drop-down menu choose Manage Cards, then View/Update Cards.

3. Click on the card you want to update

4. Choose reset pin
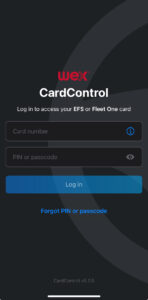
5. Open the Wex CardControl App on your phone
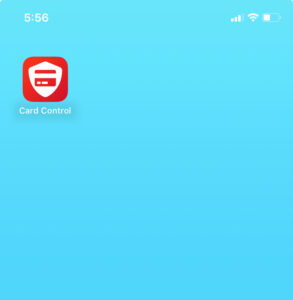
*If you haven’t already you can download the Wex CardControl App from the Apple Store or Google Play.
![]()
![]()
6. Enter your EFS Iron Fuel Card number.
If this is your first time logging in, use the last 4 digits of the card for the pin.
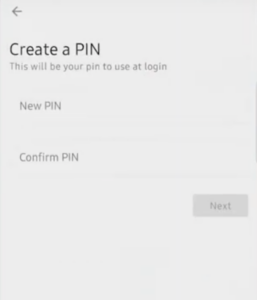
7. The App will ask you to enter a new PIN.
*This pin is for opening the app only.
It will not affect anything else, including what you enter at the pump.
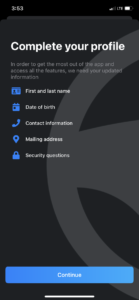
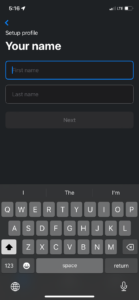
8. Once your PIN is set up, the app may prompt you to set up a profile.
You can skip this step if you want, it’s not required.
*Note: Your EFS account may also notify you when your PIN is changed.

Using the Wex CardControl App
Helpful tips and a quick guide to the Wex Card Control App.
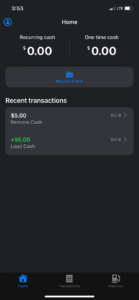
The first screen shows available funds and recent card activity, including transactions.
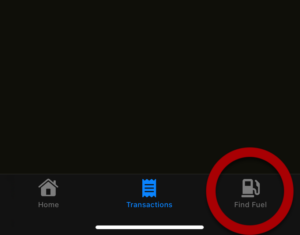
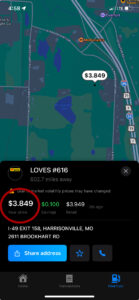
To Find a Fueling Station select “Find Fuel” in the bottom right corner.
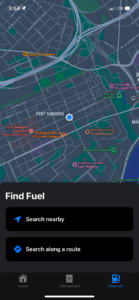
You can choose between searching nearby or searching along a route.
*Note: The app will show in-network locations: Love’s, Pilot, Flying J, TA/Petro, Casey’s, AMbest, and 7Fleet.
*One9 and Mr. Fuel may also show up on the app. They are not part of the Iron Fuel Network and you won’t receive a discount, but you can still fuel up there with your Iron Fuel Card.
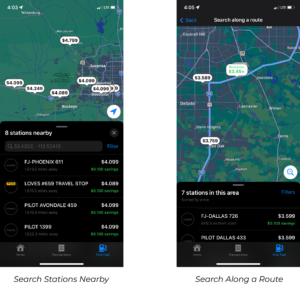
When looking at fuel stations, the price that shows up in the app is the discounted price you get with your Iron Fuel Card.
*Note: When you are fueling up at the pump, the final cost will show up without the discount applied.
Once the transaction has been completed, the EFS system will adjust the price to include the discount.
The final price will show up correctly with the discount applied in “recent transactions” on the app.
- Account Set Up
-
How to Set Up Your Account
2. Log in with the Carrier ID and password that was included in an email from Iron Fuel.
3. You will be asked to set up your Secure Entry Code. Enter a code that is 4-7 numbers long.
Once entered, it will ask you to enter the code again to confirm the code.
4. Create your user profile by filling in all the fields marked by an asterisk
5. Add a Call-In ID/Employee number and a Call-In/Security Code and then click update.
This call-in pin allows you to get help with your account when you call customer service. The pin must be between 4-12 digits.
6. Select and answer 3 security questions.
7. Complete the Security notification profile with your email and phone number. For Preferred Contact Method choose both.
*Adding your phone number can help you enter your account quicker when asked for a security token upon login.
8. It may give you the option to change your password. If you’d like, you can change your password.
*Passwords must include at least 1 digit and 7 characters, 3 of which must be distinct. Avoid using special characters (e.g. ; ?).
9. Once the profile has been completed, you’ll be taken to the data sharing preference page.
To share your fuel information with ELD software or other programs you are using, choose that program from the drop down menu.
Depending on the program, you will either receive an on-screen prompt or an email with additional steps.
*You can always come back and set this up later.
10. Click on the Home button at the bottom of the page. Click OK on the popup. This will take you back to the homepage where you can log into carrier control.
Your account is now set up.
11. Now you can log in to the EFS CarrierControl app, using the same credentials as you did to log in to the website. This app will help you to see your balance immediately and manage cards and transactions easily.


- Activate Your Fuel Card
-
How to Activate Your Fuel Card
Step by Step: How to Activate Your Fuel Card
2. Go to the Select Program drop-down menu
3. From the drop-down menu choose ‘Manage Cards’
4. Choose ‘View/Update Cards’
5. Click on your card number from the list of cards (if more than one card on your account)
6. Choose ‘Activate’ and click ‘Save’
Note: The “Reset Pin” button on this screen is used to log into the Wex app. For 24hrs, it changes the app pin# to the last 4 digits of your card number.7. Click ‘Add Prompt’. This is what you’ll be asked to enter when you use your card at the pump.
8. Choose ‘Personal ID Number’, choose ‘Next,’
9. Choose ‘Exact Match’, then ‘Next’
10. Enter pin# then click ‘Finish’
11. You can add unit #, driver name, etc. This is helpful if you have multiple drivers or cards.
- Add Users
-
How to Add Additional Users to Your Account
If you have multiple card users, you’ll need to set up a different account for each user.
1. Select program > User Administration > Manage Users
2. Click ‘Add Users’
3. Fill in all required fields with the user’s information:
- Company ID
- User ID
- First Name
- Last Name
4. Complete the Call in ID/Employee # and a Call-in Pin/Security code. This is required for users to speak to EFS employees about their accounts.
5. Add the User’s email address
6. For Group Id Select ‘Company Admin’ for Full eManager access.
7. Select Save
8. The User will receive an email with steps to complete the process of setting up their account.
- Wex App Set Up and PIN
-
Set Up and Change the PIN on Your Wex App
24 hours after your fuel card is activated you’ll need to change the PIN on the Wex Card Control App to be able to use it.
Resetting the pin is for the app only. It doesn’t change anything that you’ll be prompted to enter at the pump.
1. After the fuel card has been active for 24hrs log into your EFS Account.
2. Click Select Program at the top.
From the drop-down menu choose Manage Cards, then View/Update Cards.
3. Click on the card you want to update
4. Choose reset pin
5. Open the Wex CardControl App on your phone
*If you haven’t already you can download the Wex CardControl App from the Apple Store or Google Play.


6. Enter your EFS Iron Fuel Card number.
If this is your first time logging in, use the last 4 digits of the card for the pin.
7. The App will ask you to enter a new PIN.
*This pin is for opening the app only.
It will not affect anything else, including what you enter at the pump.
8. Once your PIN is set up, the app may prompt you to set up a profile.
You can skip this step if you want, it’s not required.
*Note: Your EFS account may also notify you when your PIN is changed.
- Using the Wex App
-
Using the Wex CardControl App
Helpful tips and a quick guide to the Wex Card Control App.
The first screen shows available funds and recent card activity, including transactions.
To Find a Fueling Station select “Find Fuel” in the bottom right corner.
You can choose between searching nearby or searching along a route.
*Note: The app will show in-network locations: Love’s, Pilot, Flying J, TA/Petro, Casey’s, AMbest, and 7Fleet.
*One9 and Mr. Fuel may also show up on the app. They are not part of the Iron Fuel Network and you won’t receive a discount, but you can still fuel up there with your Iron Fuel Card.
When looking at fuel stations, the price that shows up in the app is the discounted price you get with your Iron Fuel Card.
*Note: When you are fueling up at the pump, the final cost will show up without the discount applied.
Once the transaction has been completed, the EFS system will adjust the price to include the discount.
The final price will show up correctly with the discount applied in “recent transactions” on the app.